Computer Assisted Implant Planning and 3-D Printed Surgical Guides
By William Wilson, Jr., DDS, MS
When planning for surgical placement of dental implants it is imperative that we begin with the end in mind. No longer should we be surgically placing dental implants without a detailed restorative plan. This plan should include the position, size, and number of dental implants. We need to know if the prosthesis to be supported and/or retained with dental implants will be a fixed or a removable prosthesis. We need to decide before surgery if this prosthesis will be screw or cement retained.
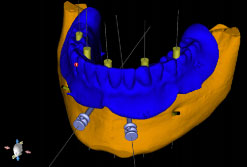
Figure.1

Figure.2
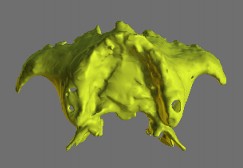
We even need to know the final restorative materials as this determines how much prosthetic space is required. We now have the technology with the aid of CBCT imaging and dental implant planning software to register the prosthetic plan with the radiographic imaging for a detailed analysis of the relationship between the planned restoration, the available bone, and important anatomical structures. We believe that dental implant treatment continues to be best accomplished using a team approach and communication is key to success with any team. Registration of the planned prosthesis with the CBCT imaging and 3-D volumetric rendering is accomplished using dental implant planning software (Fig 1), and each component can be made visible or hidden from view as desired. The 3-D volumetric rendering can be made translucent (Fig 2) and as seen in this image the vertical space required for the prosthesis will require significant alveoloplasty prior the the implant osteotomies.
It is possible to have before-hand knowledge of how much osseous reduction (if any) that will be required during surgery, and this can be precisely communicated with a bone level reduction guide (Fig 3). The guide can be seated onto the alveolus and stabilized with stabilization pins.(Fig 4) The alveoloplasty can be accurately performed at the position as planned in the software. (Fig 5) The prepared alveolar ridge is now ready for placement of the implant surgical guide.
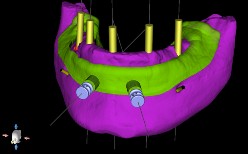
Figure.3
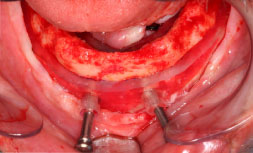
Figure.4
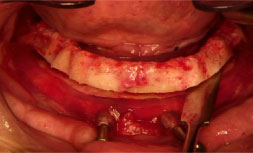
Figure.5
Fabrication of an implant surgical guide detailing the location, size, angulation, and depth required for each dental implant is also possible. This guide can be either tissue supported, teeth supported, or bone supported. A bone supported guide is shown below (Fig 6) and is much more stable and accurate than a tissue supported guide, but not as accurate as a tooth supported guide. It is critical to know the diameter of the “spoons” to be used during surgery before fabrication of the guide. Each guided surgery kit manufacturer has a unique size of “spoon” and this needs to be known so the appropriate “master sleeve” or metal “cylinder” can be provided and inserted into the printed guide. These “master cylinders” can accommodate the “spoons” found in the guided surgery kit to narrow the lumen for each diameter drill and the drill can have an attached “stop” that can be adjusted, or the “stop” can be part of the manufactured drill. (Fig 7) Knowledge of the particular guided surgery kit must be known in advance of the planning in the software, but this can be easily managed with some careful attention to detail. The result is predictable and typically provides for a less time consuming surgery. (Fig 8)
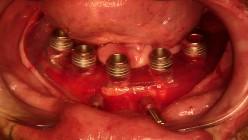
Figure.6
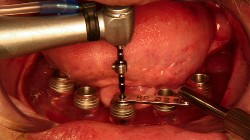
Figure.7
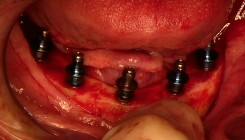
Figure.8
Anatomical modeling is a process of segmenting the DICOM data layer by layer and is not a simple process of “just press a button and print”. Maxillary models take more time than mandibular models due to the fine detail found in this anatomical structure.
After segmentation the DICOM data is converted to an .stl file that can be sent to the 3-D printer for additive manufacturing.
Figure.9
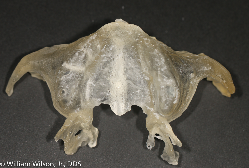
Figure.10
CLINICAL TIPS FOR SUCCESS
For edentulous patients when using the “dual scan protocol”:
Make sure the dentures are fully seated during the CBCT scan. Use a bite registration material that has set at centric relation, and ask the patient to bite down as hard as possible for the duration of the scan. Failure to do this will result in a mandibular denture that is “floating” during the scan. This will result in the planning being done from a non-repeatable position and when the surgical guide is seated prior to the stabilization pins being placed (tissue borne guide) you will have placed the guide in a different position than where it was during the planning.
For dentate patients:
Use a set bite registration material (non-radiopaque) or cotton roll placed between the teeth to make sure there is no occlusal contact during the scan. Failure to do this will result in overlap of the maxillary and mandibular teeth as well as radiographic scatter being projected over both arches. This may result in a scan that can not provide the most reliable registration with the diagnostic casts and diagnostic wax-up.
If metallic dental restorations are creating unacceptable radiographic scatter:
Use a plastic impression tray and attach radiopaque fiduciary markers to the tray. (Stainless steel ball bearings, gutta percha, or commercially available markers). Make an alginate impression of the dental arch to be imaged with this tray and obtain the CBCT image while the tray is in the mouth. Remove the impression tray after obtaining the image. Using care not to move the fiduciary markers, pour the impression with a fast setting stone. DO NOT SEPARATE THE STONE FROM THE IMPRESSION. Retrun the impression tray with the fiduciary markers and set stone to the CBCT and scan the tray, markers, and set stone. This image will allow us to register the diagnostic cast using the fiduciary markers that were present in both the scan of the cast and the scan of the patient. This protocol will make the negative effects of radiograhic scatter of the dentition manageable and ensure we have a useable and accurate tooth borne surgical guide.
Comments closed
No comments. Leave first!